
5 Biomechanical Tips to Improve Your Climbing Technique
At every level, rock climbing requires strength and the application of that strength through efficient technique. Efficiency, however, is determined by proper biomechanics. This means using interdependent muscle systems to apply force at the right time and in the right direction using as little energy as possible. To a new climber, getting all the bits and pieces working together might be overwhelming at first. While there is no single tip to instantly improve performance, proper climbing biomechanics can be broken down into parts and practiced just like any other sport. Here, I outlined 5 simple biomechanically-based tips to improve your climbing technique and help you feel more solid in the gym or on rock.
1.) No If’s, And’s, or Butts About It: Activate Your Glutes!
The gluteal region is comprised primarily of 3 muscles (gluteus maximus, medius and minimus) that, put simply, make up your butt. But they are so much more than just a seat cushion! The glutes are powerful extensors, assisting in a wide array of motions such as keeping the hips in-line with the rest of the body. In climbing, this is especially important for maintaining body tension on steeper terrain. Without gluteal activation, the hips can fall out of alignment, breaking the kinetic chain.
For many years, I felt there was something missing in my own climbing—a link—that connected the upper and lower body. I thought if I did more planks and worked my anterior core, this would help maintain body tension on steeper walls. However, I was mistaken. While the anterior core muscles (rectus abdominis, transverse abdominis) are important stabilizers and hip/trunk flexors, they will NOT help when your hips are sagging back and pulling you off the wall. For this, we have to look to the posterior chain and allow the glutes to keep the hips in-line.
Let's do a small test, shall we? During the next warm-up, find a moderately steep wall with good hand holds and decent feet. Hang for a second to get acclimated to the body position. Then squeeze the glutes together, tuck the tailbone, and push the hips forward. Feel the difference? The hips are now in-line, transmitting the forces up the chain, from the feet to the legs to the hips and into the upper body. Try this cycle a few times: relax the glutes and let the hips sag, then tuck the tail bone under and push the hips in line. Relax, contract. Passive to active. Feel how this changes your body positioning and where the forces are moving. Can you relax your abs and still maintain tension? Probably so! Perform this drill a few times before hoping on a steep project to see if there is a difference in your performance.
2.) Activate Your Scapular Retractors/Depressors
Scapular retraction is the act of pulling the shoulders blades (scapula) together and having them “kiss.” Scapular depression (a.k.a. The anti-shrug) is simply pulling the scapula down, creating space between the ears and the shoulders. These movements are accomplished using the muscles of the mid-back such as the rhombodius major, minor and the middle-lower fibers of the trapezius. When used in conjunction, scapular retraction and depression lift the chest and provide stability at the shoulder (glenohumeral) joint. Sadly, these muscles are often overlooked in a training cycle, leading to muscular imbalance and increasing the chance of shoulder injury.
There are a few movements where scapular retraction and depression are particularly important. During overhead movements or those requiring rotation (think gaston lock-off above the head), the scapular retractors and depressors are essential for keeping the head of the humerus in the cup of the glenoid cavity. Without keeping the scapula in place, the humerus is pulled up and can pinch a rotator cuff tendon (impingement). This muscle group also help initiate large pulls and prepare the shoulders to absorb forces during contact with the next hold.
When used in combination with gluteal activation, these two muscle groups contribute tremendously to proper posture on and off the wall. While climbing, they maintain a biomechanically-sound position that reduces injury and provide greater stability through the full range of motion. When off the wall, they maintain a confident, healthy posture and help us avoid looking like the cave men and women that we truly are.
3.) Recognize and Reduce Over-gripping
Over-gripping is applying too much force to a hold when not necessary. There are a myriad of reasons why this happens: Are you scared? Nervous? Not sure what the next hold or sequence is? Maybe you don’t trust your feet? All of these can lead to over-gripping, which is one the fastest way to get pumped early on a route. To fully understand the mechanism at play here, let’s take a look inside the forearm musculature to see why over-gripping is so deadly in climbing.
In sport science, rock climbing is seen a series of sustained, isometric contractions of the finger flexors. This means the muscles moving the fingers contract against an unmoving object (such as a rock hold) for extended periods of time. Sustained contractions reduce blood flow into and out of the forearm muscles, causing the muscle to become oxygen-deficient and acidic. Even at intensities as low as 20% of maximal contraction, blood is occluded to the forearms. As the contraction intensity increases, blood is occluded to a greater extent with almost complete cessation at around 50% of maximal contraction. This leads to an acute-onset muscular fatigue we know as a “forearm pump” and a sad, whimpering “Take!” from the fatigued climber.
Luckily, over-gripping can be easily recognized and worked on in a controlled environment. During a warm-up or easier route, ask yourself: can I relax my hands on this hold? There’s a good chance you probably can by moving your hips closer to the wall and trusting your feet more. Once you’ve recognized over-gripping, keep trying to relax until you’re just barely applying enough pressure to stay on the hold. Everything between where you started and where you are now was slowing blood flow and could be wasting valuable forearm capacity during a redpoint burn. Continue this throughout the day, moving from the warm-up to slightly harder routes—maybe even implementing this task on the easier sections of your project.
4.) Breathe in. Breathe out.
Proper breathing provides physiological, psychological and biomechanical benefits to climbing performance (outside of the obvious necessity of keeping us alive). A consistent, steady breath not only ensures blood is oxygenated but continuously removes carbon dioxide from the blood stream (arguably the more important of the two). The breath can calm the mind during a rest or be a good cue to get psyched for the up-coming crux. It can also be a tool for coordinating movements during a redpoint burn, creating flow and choreography while climbing. Let’s dig deeper into each of these to see the true power of the breath.
As we learned earlier, over-gripping cuts off the oxygen supply to the working musculature of the forearms. However, not breathing is effectively cutting off the oxygen supply to the entire body! As we climb, muscles require oxygen for continued energy production. Without oxygen, muscles rely on glycolysis to produce energy. This pathway produces more detrimental by-products (I.E. Hydrogen ions, lactate) and is not sustainable for long periods. Keeping your body aerobic, your blood oxygenated and your muscles neutral in pH is essential for climbing endurance.
Next, breathing can be used as a cue to relax or get ready for the upcoming section of a climb. Imagine yourself resting midway through a tough redpoint. You’re tired, but the crux is staring you in the face. Is the climbing delicate and tenuous? Maybe it’s a series of burly deadpoints between mediocre holds? These scenarios require different levels of psychological arousal, which can be tapped into with the help of the breath. A prime example of this was Daniel Wood’s preparation for The Process in Bishop, California. This 50-foot, V16 mega-high ball required everything for Daniel to send, including linking his breath with sections of the climb. In order to get himself prepared for each section, he broke the climbing into distinct styles with distinct breathing patterns. Not only did this allow him to stay calm, but it prepared his mind for the type of climbing that laid ahead.
Lastly, the breath can be a cue for movement coordination and finding a state of “flow.” Breathing functions as an internal metronome—a means of keeping everything moving together. This is exemplified in yoga, where linking the breath and the pose aids in finding flow within the vinyasa. Even powerlifters utilize a similar technique, known as the Valsalva Menuver. Lifters will commonly inhale at the beginning of a lift to create pressure in the abdomen and brace the muscles of the core. Then exhale during the concentric portion of the lift to maintain body tension and synchronize muscle activation.
We as climbers can incorporate this in our own performance to link movements together smoothly. While it takes practice, proper breathing can turn a redpoint into choreography—flowing from one body position to the next with each breath. During a warm-up is a good time to practice proper breathing. Inhale in preparation for a throw or dyno, then exhale when making the move and standing up. This will ensure the core is tight and also give an auditory cue to contract muscles in unison.
5.) Practice Makes Better Practice.
This is may be the most important point on the list. It cannot be emphasized enough: climbing is a skill sport. It requires constant practice and continual refinement of complex movement patterns. Much like concert violinists spending hours practicing their daily scales, climbers must also go back to the basics and practice their own fundamentals. Footwork, motor skills and tension drills are our scales. The gym is our practice room. After a certain point, it is not enough to muscle our way through the newest set at the local climbing gym. Doing this may help us feel accomplished, but will only reinforce sloppy technique and poor footwork when were pumped, 10 feet above the last bolt.
Next time you’re at the gym, pick one drill covered in this article and focus on it. Complete a full traverse with the glutes or scapula activated. Do a few footwork drills. Get your mind and body talking. Don’t just go through the motions until you’re ready to hop on the next project. Ultimately, we all want to get better at climbing and the only way to do that is through constant, vigilant, high-quality practice.
Now, get out there and do the work.
About the Author

Philip Ferrara is the founder and head coach at Mountain Sport Performance. He is a passionate trainer, researcher and exercise physiologist who has presented his work on climbing performance and fatigue at international conferences. He is a NSCA-Certified Strength and Conditioning Specialist, climbing-specific personal trainer as well as a coach for the Bozeman Climbing Team.
Follow Philip at:

Picture 1: Relaxed glutes, hips and knees sag away from the wall.
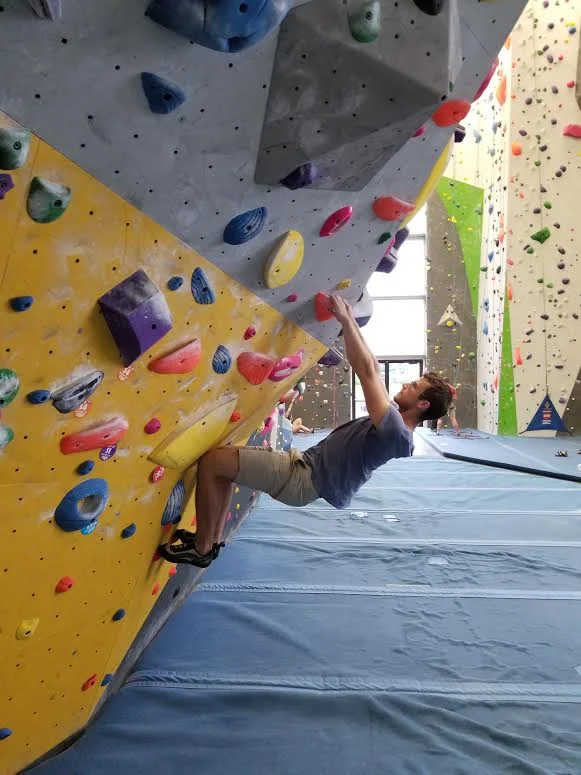
Picture 2: Activated glutes, hips are engaged and knees are brought closer to the wall.
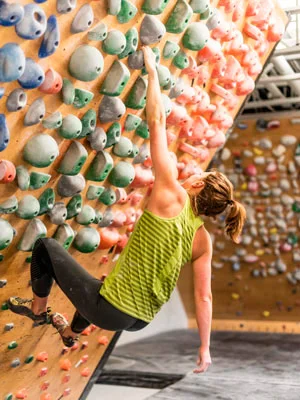
Picture 4: Passive hanging without scapula retracted. Photo courtesy of Black Diamond.
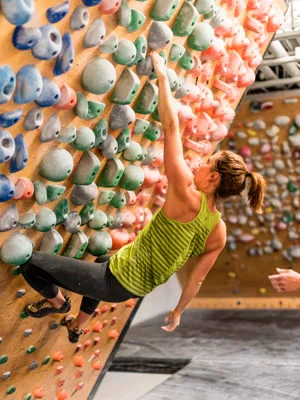
Picture 5: Active hanging with scapula retracted and depressed. Note the gluteal engagement. Photo courtesy of Black Diamond,

Picture 6: Creating internal pressure with the Valsalva Menuver.